A can seam defect is not simply a cosmetic issue. A double seam is the mechanical closure joining the can body and end, and a visible irregularity may indicate poor interlock, inadequate compression, damaged metal, or a localized loss of seam integrity. Teams should treat suspect seams as a process-control issue: contain affected production as required by the plant’s documented procedures, inspect the seam with approved methods, and identify the source before restarting or releasing product.
The most useful approach to can seamer troubleshooting is to separate the problem into four categories: seam formation and machine setup, can and end components, product or handling conditions, and inspection-system performance. Visual checks are essential, but they do not prove that internal seam dimensions and overlap meet the validated specification. A seam can look acceptable externally while having an internal defect in a limited section of its circumference.
How a double seam is formed
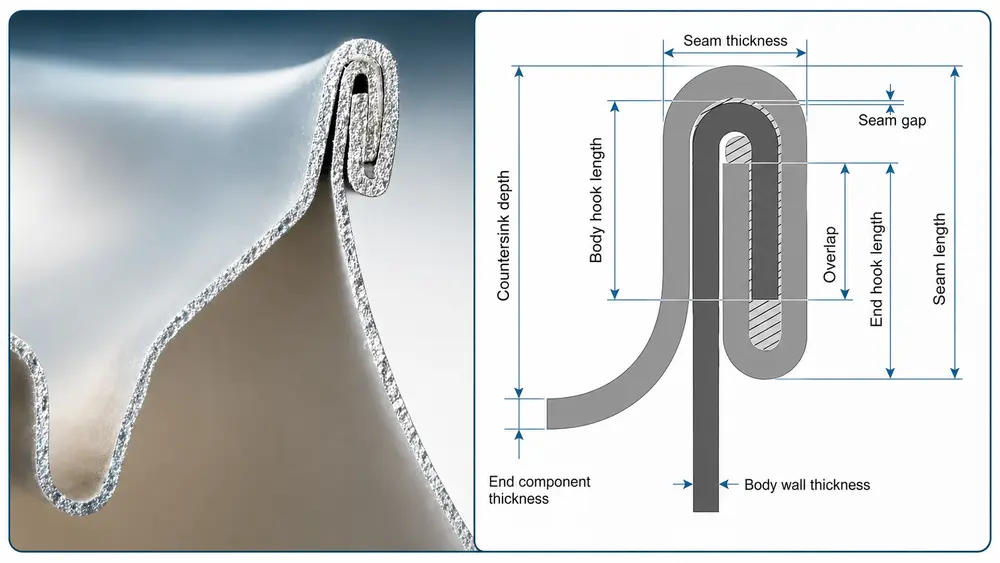
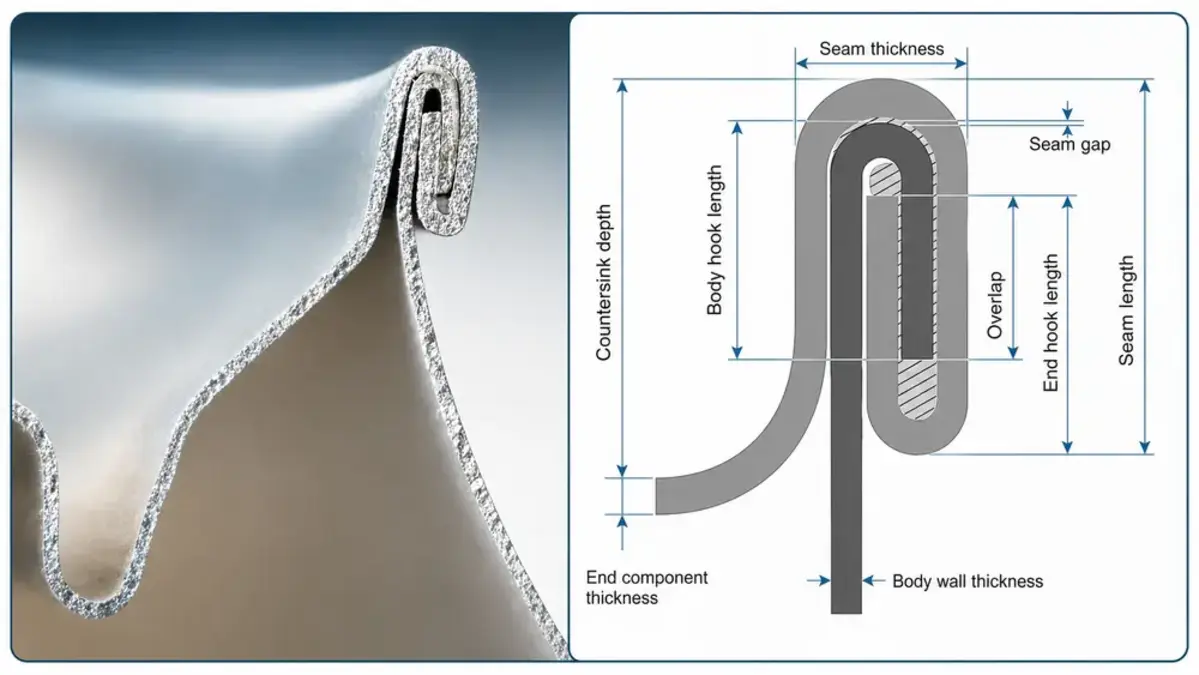
A conventional double seam is made in two operations. During the first operation, the seamer combines the body flange and end curl to create the initial interlock. During the second operation, the seam is compressed and shaped to its final profile. The end’s sealing compound is distributed within the closure as the metal layers are pressed together.
The exact tooling geometry, target dimensions, and acceptable tolerances depend on the can format, metal, end design, compound, product, and closure supplier’s specification. A setting that works on one can size or end type should not be assumed suitable for another.
Source: cnshining
A proper evaluation therefore considers both the outside profile and the internal structure. Typical seam-analysis terms include:
- Seam width and thickness: External dimensions that help indicate whether the seam profile is consistent.
- Body hook: The folded section of can-body flange inside the completed seam.
- Cover hook: The folded section of the can end curl inside the completed seam.
- Overlap: The relationship between the body hook and cover hook. Adequate overlap is fundamental to a reliable mechanical interlock.
- Tightness or wrinkle condition: The condition of the cover hook and the degree to which wrinkles or looseness appear after teardown.
- Sealing compound condition: Whether compound appears distributed as expected for the approved component system.
Common can seam defects and likely causes
A defect name describes a symptom, not a confirmed root cause. The same visual defect can result from more than one condition, so correction should follow inspection and evidence rather than adjustment by guesswork.
| Defect | What operators may see | Likely cause categories | Inspection priority |
|---|---|---|---|
| False seam | A localized area that may look normal or slightly irregular; the end curl may not be properly tucked under the body flange | Misfeed or poor end placement, damaged flange or curl, inadequate first-operation formation, worn or misaligned tooling | High priority; verify around the full seam and use teardown checks |
| Droop | A portion of the lower seam edge hangs below the normal profile | Excess metal in the seam, incorrect roll setup, component mismatch, damaged tooling | Check location, extent, seam profile, and teardown results |
| Cutover or cut seam | Scoring, thinning, or a cut through seam metal, often near a sharp edge | Excessive roll pressure, incorrect roll profile, damaged or worn rolls, misalignment | Stop and escalate if metal damage is found; inspect affected production per procedure |
| Sharp seam | A sharp or knife-like lower edge rather than a smooth finished profile | Overly aggressive second operation, incorrect roll condition or setup, component variation | Examine for damaged metal and confirm final profile measurements |
| Vee | A V-shaped projection or irregular fold at the seam | End curl or body flange irregularity, excess material, poor first-operation formation, handling damage | Inspect affected arc and confirm hook formation |
| Wrinkles or loose cover hook | Wrinkles evident in teardown or indications of poor compression | End condition, inadequate or inconsistent compression, product contamination on components, component mismatch | Assess with teardown and approved tightness criteria |
| Skidded seam | Marks or an uneven seam associated with can rotation or slippage during seaming | Can lift or chuck problems, drive or base-plate issues, poor handling, incorrect setup | Check can control through the seamer and inspect tooling contact surfaces |
False seams: why they require careful investigation
A false seam occurs when the end curl and body flange do not form the intended interlock in part of the seam. Instead of being tucked together, the end curl can fold back on itself. This can create little or no overlap in the affected area.
False seam causes often begin before the second operation. Check whether ends are centered and properly delivered, whether the body flange is uniform and undamaged, and whether the first-operation roll and chuck are in correct condition and alignment. Also examine whether the defect occurs at a repeatable turret position, on a particular end lot, after a changeover, or only during certain operating conditions. A repeatable pattern is valuable evidence and should be documented before making multiple adjustments.
Droops, vees, and excess metal conditions
Droops and vees often indicate that seam metal is not being controlled consistently around the circumference. They can be associated with excess material entering the seam, poor component geometry, roll-condition problems, or inadequate control of the can and end during closure.
Because these defects may be localized, checking only one visual angle or one teardown section can miss the worst location. Inspect the complete circumference and compare defect position with machine orientation when the plant’s procedure allows it. A defect that repeatedly appears in the same clock position may point to a tooling, chuck, lifter, or turret-related issue rather than random component variation.
Cutovers and sharp seams
A cutover is a metal-damage condition, not merely an unattractive seam. Excessive force, incorrect roll profile, worn or damaged tooling, or poor alignment can score, thin, or cut seam material. Sharp seams may be an earlier warning that metal is being worked too aggressively.
Do not attempt to compensate by making broad, undocumented adjustments. Inspect the seaming rolls, chuck, lifter, and contact surfaces using the equipment manufacturer’s maintenance instructions. Confirm that the installed tooling matches the approved can and end combination. Where metal damage is suspected, involve qualified maintenance and quality personnel and follow the facility’s hold, evaluation, and disposition procedures.
Can seam inspection: use layers of evidence
A strong can seam inspection program combines routine visual observation with dimensional and teardown evaluation. Each method answers a different question.
1. Visual inspection
Visual checks can rapidly identify obvious defects such as cut seams, droops, sharp edges, vees, incomplete seams, and visible false seams. Examine the full circumference under suitable lighting and look for inconsistent profile, metal damage, irregular folds, and defects concentrated at one location.
Visual inspection is a screening tool. It is not a substitute for seam teardown, measurement, or the plant’s validated seam-control program.
2. External seam measurements
Approved seam gauges or measurement systems can be used to monitor external dimensions such as seam width and thickness. These checks help reveal drift, variation among seaming heads, or changes following setup and maintenance.
Measurements must be compared with the applicable container specification and the site’s established control limits. There is no universal acceptable dimension for all food cans. Can size, material, end design, seam compound, and supplier requirements all affect the specification.
3. Teardown and internal assessment
Teardown inspection exposes the body hook, cover hook, overlap, wrinkle condition, and compound distribution. It is generally the most informative check when the external appearance is questionable or a measured value trends toward a limit.
Use the plant’s approved teardown method and trained personnel. Record the can format, seamer and head identification, production time, product, component lots where available, observed defect location, and measured results. Those details turn a single rejected can into useful troubleshooting evidence.
4. Verify inspection-system performance
Before concluding that a seamer is producing defective seams, verify that gauges, cutters, optical systems, and measurement methods are functioning as intended. Confirm calibration or verification status according to the site program. Ensure samples are correctly identified and that teardown locations represent the area of concern.
Automated seam-inspection systems can improve coverage and trend visibility, but they also require validation, maintenance, and confirmation against the approved measurement method. A camera system that sees only selected angles may not detect a small localized droop or false seam.
A disciplined can seamer troubleshooting order
When a defect is found, avoid changing rolls, chucks, component lots, and operating speed all at once. That can hide the actual cause and make it difficult to demonstrate that the correction worked.
Step 1: Protect product and stabilize the event
Follow the site’s documented response for suspect seams. This may include stopping the affected equipment, segregating product, identifying the last known acceptable check, and notifying quality and production supervision. For commercially processed canned foods, seam controls and testing have regulatory significance; the applicable regulatory requirements and the facility’s scheduled process documentation should govern decisions on product evaluation and release.
Step 2: Describe the defect precisely
Record what is visible and where it occurs. Note whether the defect is continuous or localized, whether it repeats at the same seam position, and whether it is linked to one seaming head, lane, container supplier lot, or period after a changeover.
Avoid using a general label such as “bad seam” when a more specific description is possible. “Localized droop at a repeatable orientation on head three” is more actionable than “irregular seam.”
Step 3: Confirm with the correct inspection method
Perform the approved visual, external-measurement, and teardown checks. Compare findings with the validated seam specification. If results conflict, investigate the inspection method and sample selection as well as the machine.
Step 4: Check components before making major settings changes
Inspect incoming can bodies and ends for damaged flanges, distorted curls, dents, contamination, mixed formats, and evidence of poor handling. Verify the correct end and can body are being used together. Component incompatibility or transit damage can produce seam symptoms that resemble a machine adjustment problem.
Step 5: Examine seamer condition and setup
With appropriate lockout and only by authorized personnel, inspect tooling condition, roll profiles, chuck condition, lifter or base-plate operation, can-height control, end feed, and alignment. Review recent maintenance, roll replacement, format changeover, or setup changes.
If the defect is isolated to one head, compare that head with a known-good head where the equipment design and procedures permit. Differences in tooling wear, roll condition, spring action, alignment, or container handling may become apparent.
Step 6: Make one controlled correction and re-verify
Make adjustments only within approved setup procedures and by qualified personnel. Then run the defined verification sequence, inspect samples at the required frequency, and document the result. Do not rely on the disappearance of one visible symptom alone; confirm that relevant teardown and dimensional criteria are again within the approved specification.
When to stop and escalate
Escalate promptly when there is a false seam, cutover, suspected metal fracture, repeated seam failure, unexplained loss of overlap, or disagreement between inspection methods. The same applies when defects recur after adjustment or affect multiple seaming heads.
Escalation should bring together production, quality, maintenance, and, when needed, the can or closure supplier and the seamer manufacturer. The objective is not simply to restart the line. It is to establish the failure mechanism, confirm the corrective action, and determine the appropriate disposition of potentially affected product under the facility’s quality and regulatory program.
Preventing recurrence
The most effective prevention is a controlled seam-management routine rather than reliance on end-of-line visual sorting. A practical program typically includes:
- Approved specifications for every can and end combination.
- Defined inspection frequency and escalation rules for startup, changeover, maintenance, and production.
- Seam measurements and teardown records linked to time, line, and seaming head.
- Routine inspection and replacement criteria for rolls, chucks, lifters, and other wear components.
- Controls to prevent mixed components and to protect can flanges and ends during storage and handling.
- Trending of seam results to identify gradual drift before a defect becomes visible.
- Training that distinguishes a visual observation from a confirmed structural seam failure.
Can seam defects are best managed as evidence-based process deviations. Recognize the visible symptom, verify the internal seam structure, isolate the likely source, make a controlled correction, and document the result against the approved closure specification. That sequence gives production teams a more reliable path than adjusting the seamer until the seam merely looks better.
References
- Food Can Double Seam Defects: Causes, Inspection, And Prevention | S.H PACKING. (n.d.). https://www.shuhaopacking.com/food-can-double-seam-defects-causes-inspection-and-prevention
- Understanding Double Seam Can Defects: Types and Their Impacts. (n.d.). https://rssmaclin.com/education/blog/understanding-double-seam-can-defects-types-and-their-impacts
- 6 Common Visual Seam Defects & How To Solve Them - Fantha Tracks. (n.d.). https://www.fanthatracks.com/blogs/6-common-visual-seam-defects-how-to-solve-them
- Double Seam Inspection: Frequently Asked Questions. (n.d.). https://industrialphysics.com/knowledgebase/articles/can-seam-inspection-frequently-asked-questions
- The Complete Guide to Can Seam Defects - Peco InspX. (n.d.). https://www.peco-inspx.com/can-seam-defects
- Visual Inspection of Can Seams in Home Food Preservation | Cooperative Extension Service. (n.d.). https://www.uaf.edu/ces/publications/database/food/visual-inspection-can-seams.php
- CPG Sec 520.200 Canned Foods - Seam Defects. (n.d.). https://www.fda.gov/regulatory-information/search-fda-guidance-documents/cpg-sec-520200-canned-foods-seam-defects
- Comprehensive Guide to Defective Cans: Types, Causes, and Inspection. (n.d.). https://quizlet.com/study-guides/comprehensive-guide-to-defective-cans-types-causes-and-inspe-a97713c8-ec2e-417f-89e6-a642fa210787