A commercial blender leaking from base is usually not a motor-base problem at first. In most cases, product escapes through the jar-bottom sealing system: a damaged gasket or O-ring, a loose retaining collar, a cracked jar, or a worn blade assembly. If the leak is accompanied by rough running, black residue, shaft wobble, unusual noise, or liquid appearing below the jar after operation, inspect for bearing and shaft-seal damage as well.
Do not continue running a blender that is leaking into the drive area. Product can reach the coupling, electrical enclosure, or motor ventilation path, while a failing bearing can quickly damage the blade assembly and jar interface. Disconnect power before inspection, follow the machine manufacturer’s instructions, and have electrical or motor-base work handled by qualified personnel where required.
Start by locating the true leak point
Operators often describe any liquid found on the motor base as a base leak. The source may instead be the lid, jar wall, blade collar, or a spill that traveled down the outside of the container. Clean and dry the machine fully before testing so the first path of leakage is visible.
With the blender unplugged, inspect the jar and blade assembly separately from the motor base. If the jar can be safely filled with water for a stationary check under the manufacturer’s instructions, place it on a dry surface or absorbent paper rather than on the powered base. This separates a jar leak from a drive-area problem.
Look for these patterns:
| Symptom | Likely cause category | First check |
|---|---|---|
| Drips form at the jar-bottom collar while the unit is stationary | Gasket, O-ring, loose retaining component, jar crack | Seal condition, correct assembly, threads or locking features |
| Leak begins only during blending | Worn rotating shaft seal, bearing movement, overload, jar seating issue | Blade shaft play, noise, coupling engagement, batch viscosity |
| Liquid appears under the jar after operation but no external drip is visible | Product may be passing through the blade assembly | Inspect underside of blade hub and bearing area |
| Jar rocks, does not sit flat, or will not lock fully | Incorrect seating, damaged collar, distorted jar or base supports | Jar alignment features and base support surface |
| Black dust, dark streaks, grinding, or squealing accompany a leak | Bearing or drive coupling wear | Stop use and inspect the blade assembly and coupling |
| Leak occurs after washing or sanitation | Seal displacement, chemical incompatibility, water entry, incomplete reassembly | Seal placement, component condition, cleaning procedure |
Inspect the jar seal and retaining assembly first
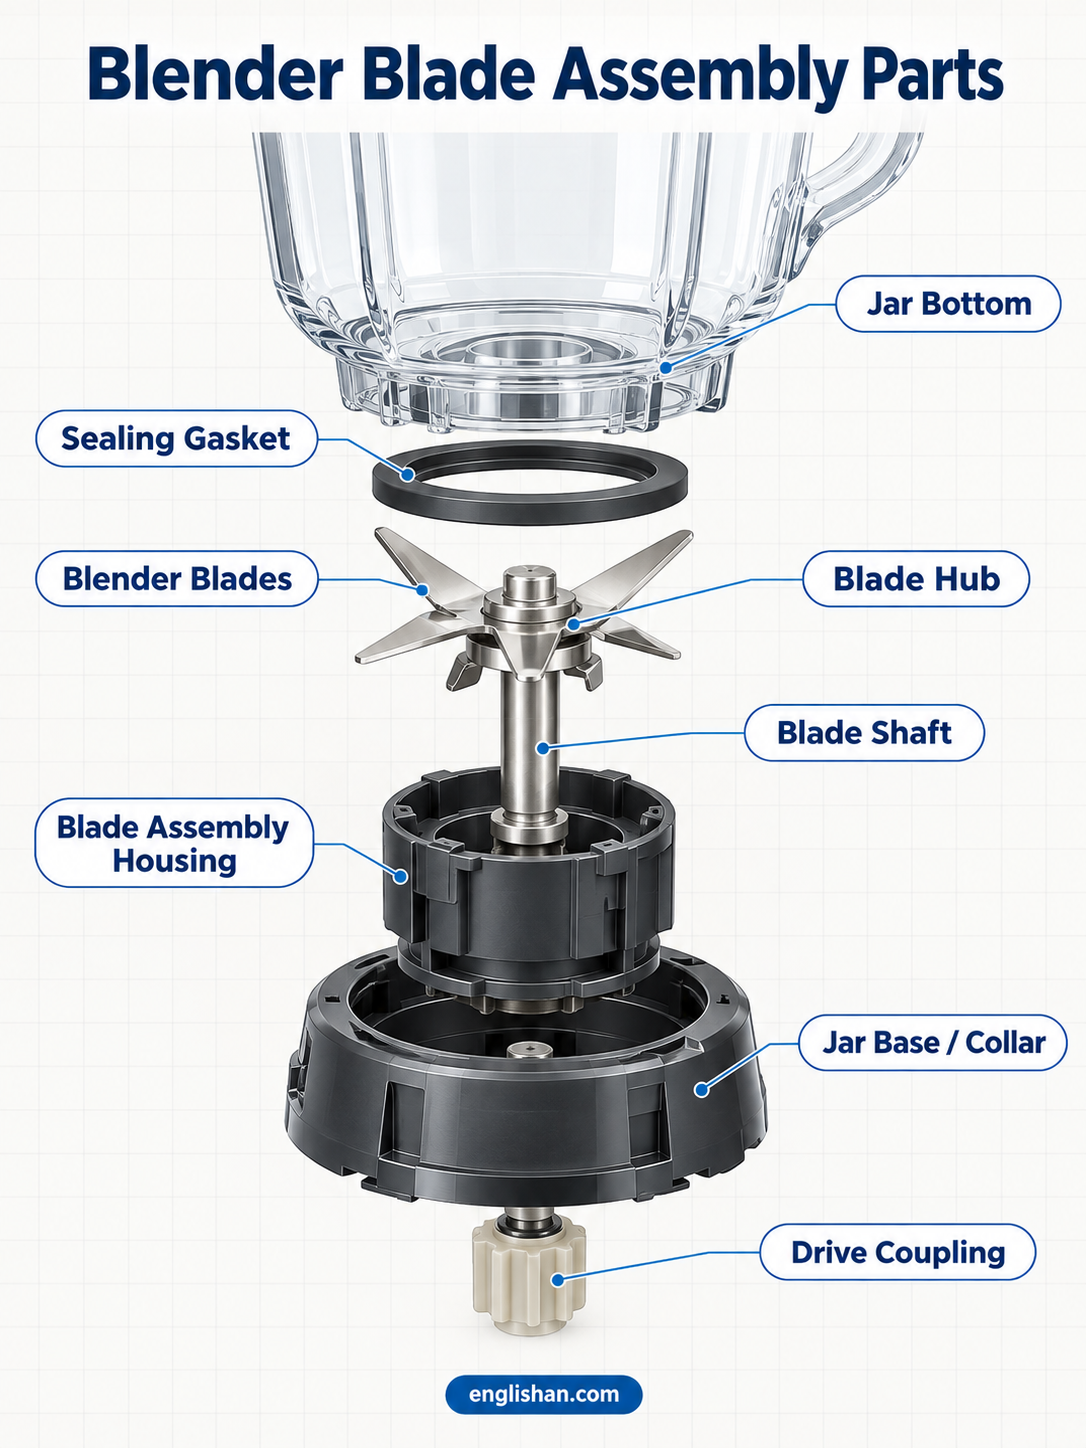
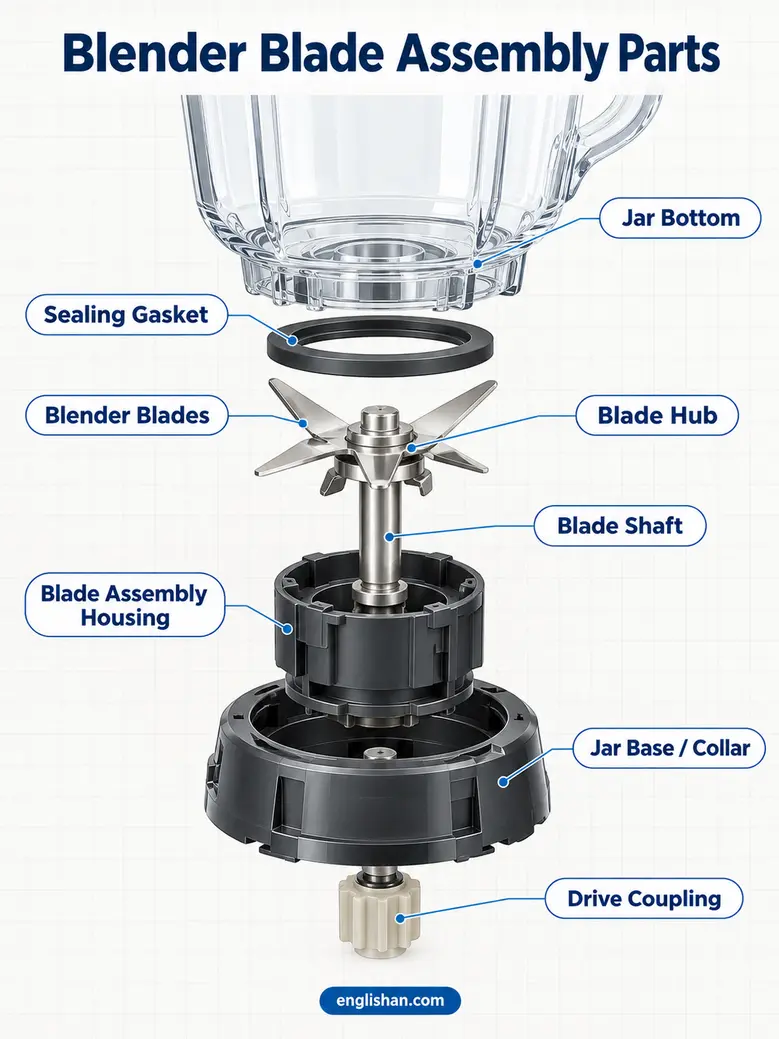
A blender jar seal failure is the most common explanation for leakage at the bottom of the container. Depending on the model, the sealing component may be a flat gasket, O-ring, molded seal, or part of a replaceable blade assembly. Its job is simple: it must create a continuous compressed barrier between the jar and the blade or collar assembly.
Remove the blade assembly only as the manufacturer permits. Check the seal for flattening, cuts, hardening, swelling, missing sections, embedded food particles, and twisting. A seal that looks intact can still fail if it has lost elasticity or is installed backward, pinched, or out of its groove.
Also inspect the mating surfaces. Residue in the seal groove, dried sauce, nut particles, or damage on the jar-bottom contact area can prevent even compression. Clean components using the approved procedure for that machine and verify compatibility of cleaning chemicals with elastomers, plastics, and metal components through the manufacturer or chemical supplier.
Do not attempt to compensate for a damaged gasket by overtightening a collar or retaining nut. Excess force can distort a seal, damage threads, crack a jar, or make later removal unsafe. Install the correct replacement part and use the specified assembly method.
Check for cracks and distorted jar bottoms
A fine crack around the jar base can look like a gasket problem. Inspect the jar under strong light, particularly around molded corners, threaded sections, the blade opening, and any transition between the vessel wall and bottom. A crack may open only when the jar is loaded, heated by processing, or clamped into position.
Replace a cracked or distorted jar. Adhesives, sealants, or improvised patches are not reliable repairs for a vessel exposed to vibration, impact, and food contact. They can also make cleaning and inspection more difficult.
Check the blade shaft, mechanical seal, and bearings
If a jar passes a stationary leak check but leaks during operation, the rotating blade-shaft system is a stronger suspect. The blade shaft passes through the bottom assembly and depends on seals and bearings to maintain alignment while the blades rotate at high speed.
A healthy shaft should rotate smoothly according to the design, without obvious grinding, binding, or side-to-side looseness. With the jar removed from the base and power disconnected, carefully assess whether the blade assembly has visible shaft wobble or abnormal axial movement. Do not place fingers near sharp blades, and do not run the assembly while attempting this check.
Commercial blender bearing failure can allow shaft movement that overloads the rotating seal. Once the shaft no longer runs concentrically, the seal face or lip cannot maintain consistent contact. Product can then pass into the bearing cavity and eventually emerge below the jar. Continued use may spread contamination into areas that are difficult to clean and can damage the drive system.
Common warning signs include:
- A rough, grinding, rumbling, or squealing sound during operation.
- Blades that spin less freely than normal when handled safely with the machine disconnected.
- Noticeable blade-shaft wobble.
- Persistent leakage from the center of the blade assembly rather than the outer gasket line.
- Dark debris, discoloration, or residue around the lower shaft or coupling area.
- Repeated seal failures on the same blender despite correct installation.
In many commercial units, the practical repair is replacement of the complete blade or jar assembly rather than field replacement of internal bearings and seals. The right decision depends on the model, availability of approved parts, the condition of the jar, and whether the manufacturer supports service of that assembly. If a repair would require opening the motor base or changing shaft-related parts without an approved service procedure, use qualified service support.
Source: englishan
Inspect the drive coupling and jar seating interface
The drive coupling transfers motor rotation to the jar blade assembly. It does not normally seal product, but wear or misalignment at this point can contribute to seal and bearing damage.
Look for rounded drive teeth, chipped engagement features, melted or polished surfaces, cracks, looseness, or uneven wear. Check both the motor-side coupling and the mating piece on the jar assembly where accessible. A worn coupling can cause intermittent engagement, vibration, impact loading, and extra heat at the blade shaft.
Also confirm that the jar seats fully and evenly on the base. Many blender designs use locating tabs, collars, or interlocks that must engage correctly. A jar that sits crooked can load the blade shaft off-center. Do not defeat a safety interlock or modify the jar supports to force an imperfect fit.
If multiple jars are used on one base, compare their seating and engagement. A problem limited to one jar usually points to that jar, collar, blade assembly, or its mating features. A problem affecting several jars may point to a worn base coupling, damaged support points, or an operating condition common to all batches.
Review process conditions that shorten seal and bearing life
Leaks are often accelerated by the product and duty cycle, not just by a faulty part. Thick vegetable purées, nut-based products, dense gravies, pastes, and sauces can impose high torque and radial loads, especially when operators start at high speed with insufficient liquid or an overfilled jar.
A high-speed blender is not protected from mechanical stress simply because the motor continues to turn. Product that does not circulate can leave blades working in a dense pocket, transmitting shock and heat into the shaft, seal, bearings, coupling, and motor drive.
Review these operating factors:
- Batch size: Do not exceed the approved working volume, particularly for dense products that rise or stall during blending.
- Product flow: Use the loading order, speed progression, and tool use approved for the blender model. A product that cannot circulate may need a different process sequence or equipment type.
- Ingredient abrasiveness: Seeds, hard particulates, fibrous vegetables, mineral residue, and certain dry inclusions can accelerate wear on blades and sealing surfaces.
- Temperature exposure: Verify the equipment’s approved operating limits for hot products. Thermal cycling can affect seals, jar materials, and assembly tightness.
- Duty cycle: Repeated long runs can raise temperatures in bearings, seals, and motor components. Let the manufacturer’s operating guidance determine permissible continuous use and cooldown practices.
- Cleaning exposure: High-pressure spray, soaking, or incompatible chemicals can damage seals or force liquid into areas not designed for it. Follow the documented cleaning method for the exact model.
A practical troubleshooting sequence
Use this sequence to avoid replacing parts blindly.
- Stop and isolate the machine. Disconnect power and clean exterior spills so the source can be observed.
- Identify whether the liquid began above or below the jar collar. Check the lid, jar wall, handle area, and outside surfaces before assuming a blade-base failure.
- Perform a stationary jar inspection. Look for leaks at the gasket line, cracks, and loose retaining parts without operating the blender.
- Inspect the gasket and mating surfaces. Replace a damaged, hardened, swollen, or displaced seal with the correct approved part.
- Check blade assembly condition. Look for shaft play, rough rotation, center-hub leakage, or noise that indicates a likely bearing or mechanical-seal issue.
- Inspect seating and coupling wear. Confirm the jar engages properly and the drive components are not chipped, rounded, or loose.
- Review the affected batch conditions. Note product thickness, fill level, blend time, speed selection, ingredient type, and cleaning events preceding the failure.
- Test only after correct reassembly. Use the manufacturer’s procedure and stop immediately if leakage, vibration, or abnormal sound returns.
When to repair and when to replace
Replace the gasket or O-ring when it is the only damaged component and the jar, blade assembly, and mating surfaces are sound. Replace the complete blade assembly when shaft play, bearing noise, center-shaft leakage, or mechanical-seal failure is evident and the manufacturer provides that assembly as a service part.
Replace the jar when it is cracked, distorted, has damaged locking features, or cannot provide a stable seal with a known-good blade assembly and gasket. Seek qualified service for motor-base coupling damage, electrical exposure, intermittent operation, overheating, unusual motor noise, or liquid that may have entered the base.
A repeated failure pattern deserves a broader review. If seals and blade assemblies fail frequently, inspect the operating method, product viscosity, batch loading, cleaning practice, jar seating, and compatibility of replacement parts. Replacing the same component without correcting the underlying load or alignment problem usually leads to another leak.
Preventing repeat base leaks
Effective high speed blender maintenance is mostly routine inspection and correct operating discipline. Keep spare approved seals and blade assemblies where frequent production use justifies them. Train operators to report new noise, vibration, resistance, or drips before a small seal problem reaches the motor base.
After cleaning and before production, check that the jar is dry on the outside, the gasket is seated correctly, the blade assembly is secure, and the jar locks into position without rocking. During production, avoid forcing dense product through a blender beyond its intended use. For difficult sauces, nut products, or viscous vegetable mixes, confirm that the equipment and process method are suitable for the required texture and throughput.
The key distinction is simple: an outer gasket leak is often a straightforward jar-side repair, while a leak through the rotating shaft may signal bearing, seal, alignment, or overload damage. Finding that distinction early protects the jar, the motor base, and the production schedule.
References
- Expert Solutions for Blender Leaks and Glass Blender Issues. (n.d.). https://www.justanswer.com/small-appliance/ecpq3-blender-bottom-glass-blender.html
- Help our instapot blender keeps leaking after blending …. (n.d.). https://www.reddit.com/r/Instapot/comments/umb8rr/help_our_instapot_blender_keeps_leaking_after
- Blender Jar Leaking. (n.d.). https://producthelp.kitchenaid.com/Countertop_Appliances/Blenders_and_Hand_Blender/K150_Series_Blender/Leaking/Blender_Jar_Leaking
- Breville Blender Leaking? Expert Troubleshooting Guide. (n.d.). https://www.justanswer.com/small-appliance/vw6al-breville-hemisphere-blender-leaks-black-specks.html
- Troubleshoot Blender Leaks: Prevent Smoothie Spills. (n.d.). https://lifeboostcoffee.com/blogs/lifeboost/troubleshoot-blender-leaks-prevent-smoothie-spills
- Blender leaking at blade attachment, how to fix?. (n.d.). https://www.facebook.com/groups/341011863034209/posts/828634607605263
- Blender Jar Leaking? Causes & Fixes. (n.d.). https://electromax.pk/blender-jar-leaking-causes-fixes
- Why Do Blender Jars Leak? A leaking …. (n.d.). https://www.instagram.com/p/DcLxwcvjLG9